Aireforge Script
The Script module in Aireforge Studio allows you to run SQL scripts across multiple servers, similar to Microsoft's Central Management Server (CMS), but with enhanced features. With Aireforge Studio, you can leverage your existing server profiles from the Estate Manager, execute queries across multiple servers, validate your SQL, and export results. This guide will walk you through getting started and utilizing key features.
Getting Started with the Script Module
Step 1: Open the Script Module
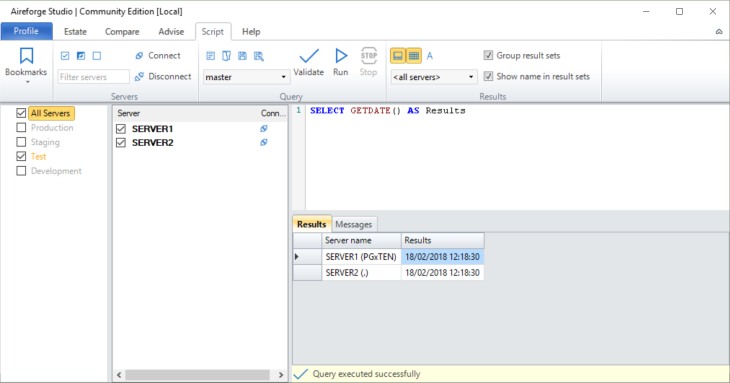
After launching Aireforge Studio, navigate to the Script tab from the main ribbon. You'll be presented with a window like the one shown below:

In this window, you'll find the following key components:
- Server List: Displays your available servers and groups (e.g., Production, Staging, etc.) from the Estate Manager.
- Query Editor: The main area for writing or pasting your SQL queries.
- Results Pane: Where the output of your scripts is displayed, either as a grid or text.
Step 2: Select Servers to Run the Script
You can run scripts on individual servers or across server groups:
- To select all servers, tick the box next to "All Servers."
- Select specific servers or groups by ticking the boxes next to them in the left-hand panel. You can also filter the server list by entering text into the Search Servers field.
Step 3: Write or Load Your Script
In the query editor, either:
- Write a SQL query directly, or
- Load an existing query by clicking the Load Query button from the ribbon.
Additional features:
- Validate Queries: Click the Validate button to check the syntax of your SQL query before running it. This uses a parser to detect any errors in the query.
- Format SQL: Click Format to auto-format your SQL code for readability. This feature aligns and styles your SQL code according to best practices.
Step 4: Run the Script
Once you have written or loaded your script and selected the target servers, click the Run button to execute it. Aireforge will run the script across all selected servers simultaneously.
Other options:
- Stop Execution: You can halt the running query at any time by clicking Stop.
- Check Query Progress: As queries execute, progress indicators will be displayed, including real-time connection status (Connecting, In Progress, Completed, or Error).
Step 5: View and Manage Results
The results of your query will be displayed in the Results tab. You have several options for how to view and organize the results:
- View as Grid: Displays results in a structured grid format for easier analysis.
- View as Text: Shows results as plain text.
- Group by Server: Use the Group Result Sets option to group the results by the server that executed the query.
- Show Server Name: Enable the Show Server Name option to include the server name in the result set to quickly identify which server produced each result.
Step 6: Exporting Results
Once your query has completed, you can:
- Export to CSV: Click the Export to CSV button to save the results for further analysis or reporting.
- Export by Server Group: You can choose to export results based on server groups, allowing for more granular reporting.
Step 7: Save and Load Queries
- Save Queries: Save your queries for reuse by clicking Save Query. This allows you to return to your work at any time.
- Save As: Use the Save As button to save a new version of your query.
- Load Queries: Click Load Query to load an existing query from your local system.
Step 8: Bookmark Servers for Future Use
You can save groups of servers for quick access:
- Use the Bookmarks feature to create and manage server groups.
- Easily load saved bookmarks to quickly load groups of servers into the Script module.
Additional Features from Code
- Query Batches: The module can handle splitting large scripts into smaller batches, automatically managing the execution across servers.
- Connection Handling: The module can open and close connections automatically as needed, or allow you to manually manage connections.
- Job Management: Queries are managed as jobs, with status updates and detailed error messages provided for each server in the job.